Posts

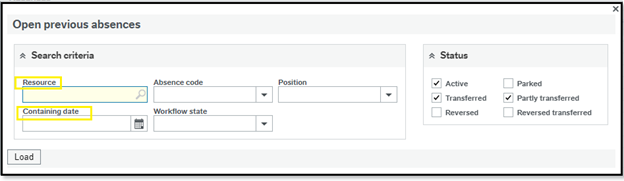
Position Illegal Error Message (Unit4 Version 7.3)
Image
On some versions of Unit4, such as 7.3, the error message “Position Illegal” can come up when a manager is trying to amend an existing absence for their staff. This error is normally displayed when they have re-opened the existing absence by filtering only by the employee’s Res ID. In this case, they will also need to fill in the containing date field to be able to save any amendments on that existing absence.

System Admin Tips: Tip 2 - Having Ticket Goals

Image
On the same spreadsheet you have your week organized also have your goals set out.  For example, if you need to deal with a ticketing system perhaps you have been given a number of tickets to resolve per day/week or you can make your own goal for how many tickets you want to resolve, open, etc. See example below: In this example, the first line shows my personal goal per day of tickets I have resolved. Second line shows how many I achieved for that day. At the end will show the sum for each line. This will help you keep track of your performance and give you extra information for when you have to do your performance review with your line manager.

How to Change Your Back Office View

Image
 If you like your Back Office to be shown by module follow the steps below to change its view: Click on File from the top menu then Options From Menu Style drop down menu choose Module Based:

System Admin Tips: Tip 1 - Organizing your priorities

Image
Something that has really helped me in my work is to organize my priories for the week in a spreadsheet. I divide it by hour, to remember what should I be mainly focusing on that time. See below an example: At the end of each week I check what I accomplished, what I priorities had to be postponed, and what will be the next week priorities and goals, both personal and the team's goal.

How To Delete a Document Uploaded in The Web (Version 7.3)

Image
On the same screen you would add a file you can also remove/delete it. On the document screen menu option click on the Actions drop-down menu after selecting the file you wish to remove: Then click Delete :

Opening Historical Items For Customers

Image
If you are after specific information about payments made or not to a customer follow the steps below. On your Financials module go to Accounts Receivable, then open the Enquiries folder and click on "Open and Historical Items per Customer". Make sure you insert the relevant information, below we've selected the CustID, but it could be the customer name, etc. If you leave the T column with a B it will only show you outstanding payments.  You can remove it and see all transactions to that customer and you can also filter by the other columns.

Checking The Last Time An User Has Logged On

Image
You might need this information for different reasons, one of them could be when you are closing or parking some users accounts which are not being in use anymore. To check when was the last time they've used their Unit4 account follow the steps below: Go to Settings - Then System Administration - System Access Log. (Screenshot 1) Double click on it and insert the res ID for the user field.  (Screenshot 2)

Workflow Map Has Disappeared - How To Fix It

 Usually when you want to see where is an item in the workflow you will also be able to see its map showing where it should go, where it has been and where it has sitting. If you have an issue with the mapping info disappearing, try doing the following tip: In you Menu go to  Agresso options, click on "Reset Display Options on Next Restart". Now log out of Back Office and log backing again. Your mapping should be showing the relevant information now.

Changing Your Date Format

Image
  When using Unit4 Web does your dates appear in the US date format?   If so, that's because your laptop is defaulted with the US date format.   To change it is pretty simple, see step by step below:  ·          Go to your browser's settings ·          Then choose option "Languages" ·          Select "Add Languages" ·          Type in "English (United Kingdom)", or the one you use; tick the box for that one and click "Add" ·          Now by clicking on the three dots for that language added check if it is displaying as your browser main language. Close your Unit4 Web page and re-open so the changes can be applied.   PS: Instructions above is for Microsoft Edge but if you are using another browser the steps are going to be the same or at least very similar to the abo...

Adding a document file to an expense claim in the Web

Image
  Time to time you get a user asking how to add a document file to their expense claim in the Web environment. If they have the permission to do that (will be discussed further on another post) the following steps will help guide them through (screenshots below from version 7.3): 1.       1 -  Go back to the expense in question 2.       2 -  Click on the paper clip icon on the right side of the screen 1.       3 -  Click Add a Document      4 -  Make sure you choose from the right Document Type option 3.       5 -  Upload your file 4.       6 -   Add description is optional 5.       7 -  Now close that window and save the expense.

How To Do A Quick Search Using The F9 Or Magnifier Button

Image
This can apply to practically anything: suppliers, users, customers, products, etc. Below is an example using the product masterfile window. If you want to find all the products that starts with "PB" on the Product field press F9 (or click on the magnifier button) and you can add the criteria you are looking for by the whole name or parts of it using (*). Example: If the product code is PBTE1234 and you only remember parts of it you can do *TE1234, *TE*, PB*, etc.  The (?) mark can be use to substitute a character on your search: P?BTE1234 but you will need to add the right number of characters or include a (*) where is needed, i.e.: P?TE*. Click F7 to see load the search results. You can do that for any field shown on the columns there, in this example: Product Code, Product Description, Product Group, Status. Use the relevant info.

How To Add Someone In An Email Alert (IntellAgent)

Image
 Lets say you have received an email from a new employee that mentioned they want to be included on a specific email alert/notification. You can find out from them what is the email alert and check on your IntellAgent which one are they relating to? You will need to include his work email address to the IntellAgent in question. Go to Settings on your Back Office menu and under IntellAgent , go to Event Enquiry. From here you can either click on the F7 button for it to show all results or filter by the name or part of the name of the alert you want to find.  Make sure to put Status N (active) to narrow down you search. On the third tab, Output, you will find who is getting the alert. Add the new person by filling in the recipient field and adding the email address on the destination field. If this query is from someone that had their email already there but they are not getting emails anymore, check the email address is correct and if the  Active option is turned on.

Chainging The Currency For An Account

Image
This might be done by an accountant in your organization or be asked by one. So this is just a quick guide on how to do it. Go to Agresso Common , Accounting Structure and then go to Chart of Accounts. Click on Rule from the menu tab. Choose the rule you want to apply and then change the default currency.

How To Do A Search Enquiry For A Product (BackOffice)

Image
Go to Product Masterfile under Logistics and double click on the Product Enquiry option: In the Setup tab you will set the criteria for what you want to see in the results page: On the Search Criteria you can refine even more your search results by adding the values you want to see on the products that will be extracted. For example: What product group(s) you are looking for; If the product starts with a specific letter; When was it last updated, etc. PS: There are other ways for you to do a search enquiry for a product and I will show you how in a future post.

How To Set Up A New User On HR Personnel

Image
 Below you will find a quick guide on where you add a new user in the Back Office environment.  Also some of the information here mentioned might not be relevant for the way your company sets up a user so you can either ignore them or add other information that might be missing here on the list. List of useful information before starting the set up: Res ID (HR number for the employee/user) Complete name Department they will work for in your organisation (HR, IT, Finance, etc) Work Telephone number  Work email address Line manager's Res ID Car Type (If your company pays for travel expenses) Go to the Human Resources and access the Personnel . On the fisrt tab you will need to add the relevant information for the user: On the second tab you will add the type of address . Check what your organization requires for this session, your line manager will be able to help you on this. Usually the following are the most used: In each "Type" of address you will add the employee...

How To Check the Historical Items Per Supplier (BackOffice)

Image
In the Financials module Choose Accounts Payable Then Enquiries Click on Open and Historical Items Per Supplier In the new window choose the SuppID option and insert the supplier ID you want to see.

How To Approve An Expense In Agresso

Image
  When a user submits an expense claim their line manager will get an email alerting of a task for them to approve in the Agresso. If there is something to approve, under workflow tasks you will see ‘Line Manager Expenses  Approval’ . Click on it to open the approval screen. You shall see all the expenses that are waiting for your approval. Have a look at each expense item and detail  by clicking on them. To approve it you can press approve , otherwise you can reject it and add a  comment.

How To Check Items To Follow Up In Agresso BackOffice

Image
 When things get stuck on the workflow you should follow these steps in  the Agresso Back Office to be able to start digging a solution for that: After that you shall find the following screen: There are your four options in the screen: Expenses Purchases Invoices Requisition Supplier Invoices It will show you how many of them need your attention on Items to Follow Up. Once you click where it is needed you need to untick the " Active Items " so you can see just the ones that need you attention.

How To Approve A Requisition

Image
Approving or rejecting in the Simple Mode will be quicker but the advanced mode allows the user  to Approve and Reject individual lines with further details shown on screen. On the task icon on the top of your Agresso Web page you can see if there are any tasks (including requisitions) for you to check, approve or reject.  Clicking on the requisition you want you will see the following: Resource -  The person who raised the Requisition  Requisition number  Updated - The last update  The workflow log will show any comments   made during the workflow process.  On message it will show the purpose for that requisition, a comment entered by the requisitioner. If you want specific information about each line you can click on them individually. Now that you have checked the whole requisition you can either click on the button Approve or Reject .  If you decide to reject you must leave a comment so the requisitioner will know why it has been reject...

What Is Account Period

Image
 The Accounting Period is the period for which accounting books of an entity are prepared. It is the period for which books are balanced and the financial statements are prepared. Generally, the accounting period consists of 12 months.   Accounting Period can also relate to a month or months within the Financial Year. In Agresso, the Accounting period is coded and is written as: YYYYPP E.g. October 2011 is 201200 (YYYY being the year of the Year end 2012, PP is period 00. October is also PP 01, but it is safer to put in period 00 to capture all costs in October) June 2012 is 201209 (YYYY being 2012 and PP being period / month 09)